Showing posts with label garage projects. Show all posts

12/22/24

The Diffuser Belly Pan Project - Funky Fresh Flow

More and more, cars are being designed with aerodynamics under the car being considered as an opportunity for efficiency, not just the air flowing over the top of the vehicle. In the 1970s, the underside of a car was full of voids, gaps, and lumpy mechanical stuff. But now, even ordinary commuter cars have, at minimum, a large plastic inspection panel or belly pan of some kind under the engine between the front wheels.

Apart from reducing aerodynamic drag, these panels often are designed to help direct air into the radiator or intercooler, etc.

The underside of the BMW Z series of vehicles is pretty well flat under the nose, with the inspection panel in place. Under the middle of the car, there's the underside of the passenger compartment with the exhaust and drive shaft in between. But, behind the rear axle, there are some large spaces, with the rear bumper forming a kind of huge parachute. Now, I do not have access to a wind tunnel, and I have no illusions that I can perform CFD analysis in my head (Computational Fluid Dynamics). But still, a large gap with a large concave bumper cover right behind it has got to be an opportunity for air to swirl around and get all sub-optimal with its bad self. Surely, flattening the floor there can't be a bad thing, right? I've never read any forum posts explaining "I flattened the floor of my car and it ruined the handling. Don't do it."

Note the leading edge if the bumper cover, which curves forward, into the wind. The box between the mufflers is where the battery lives.

So, in June of 2024, I embarked on a mission of experimentation, with the potential for glory and radness. I reckoned I could shape some aluminum into a three-section belly pan, directing air out the back of the car, instead of into the bumper.

Disclaimer: Yes, anyone who's ever messed with CFD software will tell you that the dynamics of moving air can be counterintuitive, and can do really weird stuff that you wouldn't have guessed, just from staring at the car and frowning for a while. I did see the Mythbusters episode where the found out that driving around in your pickup truck with the tailgate down is actually worse than keeping it closed. A horizontal vortex forms there and loops around and around, while other air sails over the top of it, surprisingly improving aerodynamic drag.

But still I wanted to try making a flat belly pan. One in the middle, reaching from the differential (the box of gears between the rear wheels) all the way just past the edge of the bumper, and smaller ones just outside the mufflers and behind the wheels

Directive: No new holes. Find existing hard points to fasten the belly pans without making any new holes in the body of this already-rare car, for which parts are increasingly difficult to replace. That way, if it turned out to be a terrible idea, I would remove it and throw it into the recycle bin, with the car none the worse for wear.

The parts, modeled in CAD (Cardboard Aided Design).

There is another type of thing that's getting to be increasingly common cars: Rear diffusers. These are complex, trumpety-looking aerodynamic forms usually visible at the bottom of the rear bumper, ostensibly meant to keep air from forming drag-producing vortices as it exits from under the car. They have neat-looking strakes and fins on them, and, it must be said, are, in the vast majority of cases, very fake and non-functional. They first appeared on racing cars (as things tend to do), but now they're very much in fashion on any car that even pretends to have sporting ambitions.

My belly pan thingy would be made (mostly) from 1/16" thick aluminum, and would definitely need some stiffening fins on it. It just can't be helped if they happen to make it look like a diffuser.


The center section is about 22" deep, and reaches as close to the rear differential as I dared. So, at the very least, it's not just a decoration on the rear bumper that pretends to be a diffuser. I'm looking at YOU, nearly every car I see on the road these days.


The corner sections have a little 2" tall vertical part where they meet the inside of the rear wheel wells, in another attempt to keep air from getting directed into the bodywork... hopefully


The 2" fold at the leading edge of the pan hopefully directs air down and back, instead of up and into the convolutions of the mechanical bits down there. The fold looks like a 90 degree bend here, but it's really closer to a 45. Also, the fold helps to keep the thing from getting floppy. You'd be surprised how rigid a thin panel can be, with the addition of a few folds.


Was it necessary for the center section to curl up and follow the shape of the bumper? Nope, but it definitely looks more like it works with the shape of the car, and looks less tacked-on.

That was summer. Fast-forward a few months to drive around, do a bunch of autocross events, and go on a long trip or two, to see if it completely ruined the car, test it out, fix any annoying rattles, and make any necessary tweaks.

Verdict: I can't tell it's there. It doesn't make the car into a rocket ship. It doesn't seem to effect the handling in any way that the butt-dyno can detect. Does it effect gas mileage? Dunno. Does it look cool as hell? One hundred million percent fuck yeah.

Then came December, and I put the car into winter storage. I removed the contraption, took it all apart, and dropped the whole thing off (well, most of it) at a local anodizing shop. They said they could do orange - or at least something like it - as a custom color, if I wasn't in a hurry to get it back. I was not in a hurry. That's the benefit of winter car projects. You can be all relaxed and cool when asking shops to do stuff for you. You don't want people to be annoyed with you when doing a job for you that's so small, it's barely worth their time to bother with it.

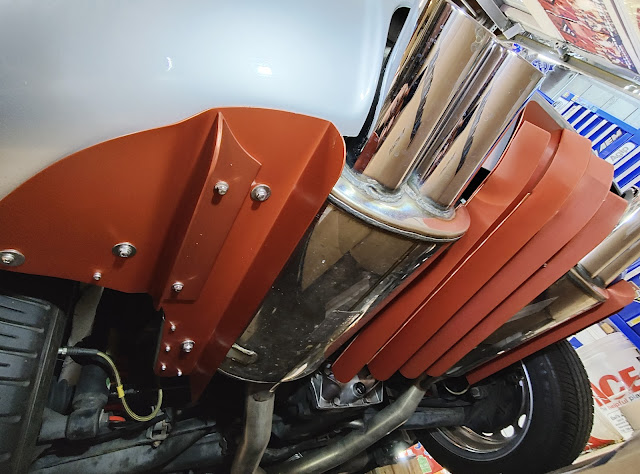
The parts were finished this week. I put it back together, and it's now back on the car and looking not at all like some knucklehead bashed it together in his garage, which is exactly what happened.


Behold the majesty.
Orange? Well, kinda, I guess. This shop mostly does industrial application anodizing, and doesn't specialize in decorative finishing. They can do green, gold, blue, and red. Orange was a special mix, and they don't pretend to be artists with color-mixing expertise. In any case, this surface should be nearly as hard as diamond, and more resistant to dings and scratches than powdercoat or paint. Plus, I won't have to be constantly buffing the thing when it gets dull looking.
What's anodizing? It's an electrochemical process involving acid, dye, and electricity that opens the pores of the aluminum, bathes the metal in a dye solution, and then uses an electrical charge to seal the surface with an oxide layer that's 5 mils thick and actually goes, not just onto the metal, but into it. I have in the past buffed anodizing off of an aluminum part with a woven nylon wheel, and it really, really puts up a fight. An anodized surface is really hard.


4/9/22

Vintage Soviet era Helios 40 lens cleaning and refurb.

Disclaimer: Old Soviet lenses are interesting to use, and can be found pretty easily at reasonable prices (okay, not this lens, but still). Ownership of, and interest in, these lenses should not be interpreted as approval of the Russian government's actions or policies. This should not need to be pointed out, but this is the internet, so..... yeah. Just saying.

A Helios-40 lens. It was made in 1961, and is sought after by vintage lens weirdos for its crazy swirly bokeh. It's pretty hard to find, making it the most expensive vintage lens I have. It was around $350. It's a huge lens, considering it's not even a zoom lens. There's a lot of glass in it. They don't appear often, and they're famous for being "The Bokeh Monster". So, they command a premium, considering it's an old mechanical lens.

The optical section on the left, having been separated from the helicoid (on the right), which is the target of this project. No way was I going to take apart the optics, even if they do have a few specks of dust. My mission was to clean and lighten up the focus ring action. Soviet-era Russian lenses are said to have been lubricated with tank grease. This one sure felt like it. Stiff and gummy. Trying to turn the focus ring often unscrewed the lens from the adapter holding it on the camera. This is unfavorable.

Scratch marks indicate where parts need to be clocked (rotationally positioned in relation to each other) for proper function when reassembled. There were already some scratches on the parts, indicating that someone had been in here before.

2mm screwdriver. It required frequent "resharpening" with a whetstone.

Note the thick and filthy alleged "tank grease".

The large threads are the helicoid, which is how the lens focuses. There are about 16 parallel threads in it, instead of like one or two. This means if you get the threaded parts engaged in one of the fifteen wrong combinations, the lens won't work right when you put it back together. Between the scratch marks already on it and the ones I added, I got confused about the orientation and I absolutely put it back together wrong... several times. Whee.

All the components of the helicoid, unassembled.

Finish Line is a favorite cleaner / degreaser made for bike chains. Made from orange peels. It's not dangerous to your health (unless you drink it), plus it smells really nice.


The focus collar had been manufactured with polishing marks in different directions. I masked with tape while I touched them up. First one direction, then the other.

The knurling had some kind of gunk in the grooves, of course. The "fixed" portion is on the left. "With vintage goo" is on the right.

A woven nylon polishing wheel. A little harsher than a cotton wheel, so it leaves a "brushed" finish. Hence, the carefulness regarding the direction of polishing.

The knurling on the right side still has the pitting and scratches yet to be taken out. The left half is cleaned up.

Cotton wheel for the faces that seem to have been intended to not have a grain to them.

Focus collar with vintage scratches visible at the bottom.


Care was taken to not obliterate the engraved markings.

Soaking again in the degreaser to remove the polishing compound.


This is a silicone grease I made by mixing silicone spray and pure silicone grease. It turned out to be a mistake. The spray was nice and thin to begin with, but after the solvent in it evaporated, it just left a very heavy grease. Too heavy for a camera lens. The right stuff turned out to be Marvel Mystery Oil (not pictured). Disassemble, degrease, and start over.


An observation on the design of old Russian lenses, compared to others. They're not very sophisticated. When you work the focus mechanism of this lens, the black ring on the left rotates against the silver barrel. It's an aluminum ring against the brass of the barrel. A Japanese lens would never allow this to happen. There would either be a bearing there, or it wouldn't be a friction point at all. In the case of this lens, it's just a film of grease keeping the two from grinding against each other. With some careful sandpaper and 3M pad work, I was able to smooth out the interface where the barrel and collar meet. There were a couple of places in this lens that I was surprised to find room for simple improvements like this.


A 2mm x 3mm screw. Don't drop it. But of course, I did. At least I had had the presence of mind to be working on a brightly colored towel, so the screw didn't bounce merrily across the bench and onto the floor, to be lost in the mists of time itself.

Reassembled, and about as good as I was capable of getting it. At least I managed to get the helicoid cleaned up. It's much lighter and whippy to use now.

It's an 85mm f/1.5, which lets in a huge amount of light. It's a very flattering portrait lens, and can be used easily in dim light. The aperture is wide open in this photo. Russian lenses are courteous enough to put the year in the serial number, almost always as the first two digits. So, this lens is a 1961 model. The logo at the bottom there is the mark of the KMZ plant, located just outside Moscow.


11/25/20

Car Roof GoPro Camera Bar - Build photos.

Pretty regularly, I like to mount a GoPro camera in my car. Sometimes its to record footage of an autocross event with my car club, or to capture footage of a scenic group drive with some other gear heads. The ideal position for the camera (for me) would be right over my shoulder. So, windshield suction cup mounts are convenient, but not quite right. So, I've been wanting to build something that would put the camera where I want it, but A) without drilling new holes in the car and B) without resorting to adhesive pads of goo, which either fall off as soon as the weather gets chilly or leave permanent spots of funny discoloration where they once were. I have a friend who positions the camera right where I'd like to, but he has a harness bar in his car (kinda like a roll cage, but not exactly), and just clamps the camera to that. I don't have plans to install a harness bar or roll cage, so I need another solution.

My car is a two-seater hatchback with a unique cargo net thing that rolls up out of the firewall behind the seats, hooking into two metal brackets mounted into the roof. It's a bit like a window shade, but upside down. After a friend (the same friend with the harness bar) pointed out that these brackets screw into the chassis of the car, and are easily removed to reveal a threaded 6mm hole, I immediately began designing in my head an aluminum strut, mounted across the ceiling of the car. These photos document the build.

Once removed, the factory hard point reveals two holes: one tapped for 6mm and one that's just a hole that locates with a stud on the back of the factory piece.

The factory hard point (passenger side). The cardboard on the right was used to mock up the shape of the box I'd have to make, in order to duplicate the fit of the factory part.


Test fitting the mockup of my cardboard box section.

The face of my replacement bracket will do away with the garment hook and extend the width of the face, to give me options to mount the camera bar. I always have my tuxedo sent ahead of me with my butler, so the garment hook has never been used anyway.

These are actually upside down. The spiral part that looks like someone's ear canal is the hook area that receives the flanged end of the rod that forms the top of the cargo net "window shade".

Cardboard mockup of my complete pocket bracket. Now, to duplicate it in metal.

The faces will me from 1/16" aluminum. It's easy to work.

Instinct tells you to cut the shapes out first, but experience has shown the wisdom of cutting the harder, interior contours out of the larger piece, and THEN cutting out the parts.

Needle files allow precise finishing of the exact shape of interiors.

Double-sided tape sticks the two faces together, so they can be filed to their final shapes together, so ensure they're exact mirror images of each other.


For the box section, I tried using the same aluminum, but when I put it in the metal brake to do the 90 degree folds, the aluminum just broke. It's not a very strong alloy of aluminum, it seems. So, these are some scrap 1/16" stainless steel pieces I had. Stainless is much tougher than aluminum, no matter what formula it is, and I wasn't looking forward to working with it.


Turns out, my little metal brake / shear / roller did have enough strength to fold the stainless. That was surprising.


Instead of one screw and one locating stud on the back of my brackets, I tapped the locator hole for the closest bolt size I had. I think it was 3/8". 


Bracket parts ready to assemble.

A woven nylon wheel was used to smooth out the aluminum parts before buffing.

Then a cotton wheel with some jeweler's rouge polishing compound to get the final finish.

I like the finished look of acorn nuts, especially when they're polished stainless. However these nuts, in stainless, were priced at $3 each! Soooo, nickel plated brass will have to do (¢47 each).


Test fit of my brackets, with the cargo net rolled up into place. I made sure to cut the hooks a little more generously than the factory piece, because IMO, it's always been way too hard to get the rod hooked in there. My new ones are easier to get in.

Now, to measure out the 36" strut. This stuff is just ordinary "pot metal" aluminum you can get form any hardware store. It's 2" extruded "L" at 1/8" thick. It won't be offering any stiffness to the chassis. Its only job is to look okay and hold a GoPro camera now and then. That block with the holes is a 123 block. They're steel blocks 1" wide by 2" tall by 3" long, and are useful for being heavy, clamping things, and for being perfectly square at all angles.

Abrasive disk to cut the ALU. It makes a terrible racket.

Measuring the angle of the bracket, relative to horizontal (more or less).

This line was erased and re-done to match the angle. Measure twice, cut once and all that.

A thin, fine-toothed blade on a bandsaw makes easy work of metals and plastic. Not so much for wood.

That top section will be folded down to match the angle of that bottom bit.

Filing and sanding the cutaway area for a cleaner seam, once the metal is folded. The sandpaper has a bit of duct tape on it, because I was expecting it to get repeatedly shoe-shined back and forth in the crack of that angle and it would have gotten torn up otherwise.

Bar in vise, and a piece of 2x4 as intermediary between the subject matter and persuasion from a large hammer. I didn't try the metal brake on the aluminum, since it's low-grade ALU and I expect it would have just broken. The vise-and-hammer technique doesn't force the metal to bend all along a narrow line, and lets it bend where it wants to, so is less prone to breaking.


Persuaded.

Masking tape to keep the vise from chewing up the metal.

Small brackets were made to reinforce the folded seam. This was probably pointless, but it looks better this way.


Test fit of completed bar. Photo was taken from inside the hatch area. Front seats are on the other side of the B pillar, there.


Another piece of stainless strap to make the bracket that mounts the camera to the bar.


I like the look of the drilled-for-weight, 1970's look. So 1" holes will be drilled all along the bar.

This thing is really useful for equally spacing things, accordion-style.

Pilot holes.

A step drill made the larger holes. The desired step was marked with a Sharpie to avoid mistakes. Fun fact: WD-40 removes Sharpie ink from almost anything, and cutting these holes required frequent spritzes with WD-40 due to friction and heat.


A second round of buffing was needed, to get rid of a bunch of scratches inflicted during the drilling.

Final install.

That.... actually came out kind of nice. And in any case, it's non-destructive, so a couple of minutes with a screwdriver and allen wrench reverses the entire thing to factory if I get sick of it. And no, my head does not bonk into it.

Believe it or not, this thing  does not obstruct the rear view mirror. I kind of feared it would, but nope.


View from outside the car, through dusty windshield.

Now, to wait for spring. Thanks for reading!