Here's some gameplay footage, in case you aren't familiar with the game, or had sex in high school...
It took a good second and a half to decide what to do for the exhibition. Just take the blue and white player ostrich, and separate his colors into layers. Then, cut the layers out of plywood and stack them up. It would just be a big wooden joust bird. Simple, right?
Simple-ish, but loads of cutting and sanding and priming and re-sanding and painting and assembly and touch ups. Anyway, it got done, and it's 28x28 inches. After the exhibition comes down, I need to figure a place to hang it. I may also need to reinforce my house so the art doesn't collapse the place. It weighs like thirty pounds.
To the left, you can see Step One. Figure out the layer order. Each layer had to cover the same or greater number of "pixels" as the one below it, so there'd be no weird voids in the sides.
After that, it was a matter of getting access to a large-format printer to have an outline of each layer printed out, to use as patterns.
The whole way through, the biggest challenge was keeping track of which chunk of wood goes to which layer, to make sure everything got painted the proper color.
Initially, I thought I'd cut out the patterns, and trace around them, but the curliness and floppiness of the paper made it really hard to make sure the drawing on the wood came out in the right shape.
Then I wised up. The smart move was leaving the paper intact, and just tapping a nail through at each corner where lines met. Then, I just removed the paper and connected the lines between the little nail marks. Victory.
The whole way through, the biggest challenge was keeping track of which chunk of wood goes to which layer, to make sure everything got painted the proper color.
The wood rasp in the above picture is the one I used to accidentally cut a vee in the end of my thumb, fingernail and all. That was enough work for one day. No ghoulish bloody thumb notch pictures for you.
Even a cheapo Chinese set of forstner bits are a smart investment. You can drill holes with perfectly clean edges. No splintery mess around your hole. The holes are just large enough in diameter to allow the sabre saw blade to turn at the corners.
The remainder wood was left in interesting shapes, such that I still can't figure if I should throw it away or not.
The plywood looked so nice bare, it was tempting to leave it unpainted. But, color would be necessary.
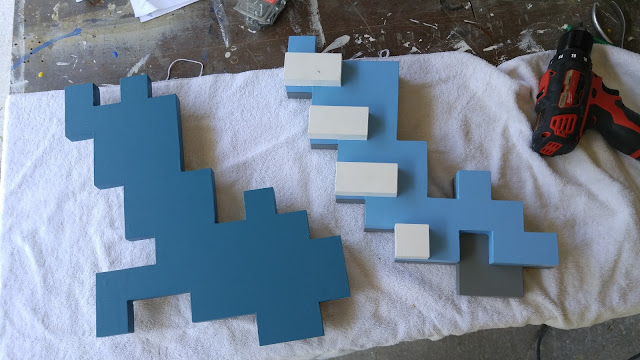
Instead of building the layers from the bottom up, which would be more intuitive, they had to be assembled from the top down, to allow access to the back of each layer, so the screw heads would be concealed.
After this photo was taken, I still had to do some straightening of some blocks. This usually involved just grabbing them really tightly and twisting, hoping they still had some play. No glue was used, so technically, I could take the whole thing apart if I needed to. However, the paint was still kind of soft at the time of assembly, so it acted like an adhesive.
Art complete!


1 comments:
...I wish I had that kind of free time LOL. Terrific job, Phil!
Post a Comment